Showing posts with label guest post. Show all posts

15 Mar 2014

FingerFood's Guest Posts - Sarah of Penny Pinching Polish

Hello everyone! Today's guest post is brought to you by Sarah of Penny Pinching Polish. Sarah is a super talented nail artist and a girl after my own heart! Skulls, studs, tattoo nails, a love of bright neons and great taste in music - what's not to love? ;) She even gets creative with her beautiful swatches (see one of my favourites here) Enjoy! Sam xx

Hi everyone!  I'm Sarah from Penny Pinching Polish, and I am super excited about appearing on FingerFood today.  I really admire Sam's style, and her freehand mani's always leave me in awe, so when she asked if I could help her out while she's dealing with this crappy flooding, I practically jumped out of my chair!
At first, I had no idea what mani I wanted to do, so in the end, I just decided to combine some of my favourite things with a few of my favourite colours.  Namely, Color Club - Raspberry Rush & Mrs Robinson, and Barry M Gelly - Blue Grape.  The black stripe is Sinful Colors - Black on Black, and the stamping is from MoYou Biker 08, stamped with Barry M Silver Foil.
The spikes came from a little bundle I bought on ebay a few weeks ago, and this is the first time I have worn these on my nails.  They're not exactly practical, but I really love the way they look.  They have a flat base, and even though I only attached them with top coat, they stayed put for a good few hours.  They would have stayed much longer with nail glue of course, but I did this mani in the evening, and wanted to be able to just pull them off before bed, so I didn't wake up with a bust lip!
So, that's all from me then.  A massive thank you to Sam for letting me take the reigns for today, and I hope I didn't waffle on too much :)  If any of you would like to check out my blog, you can do so by following this link.


12 Mar 2014

FingerFood's Guest Posts - Jeanette from Jeanette-ically Manicured

Hello everyone! Today we have a guest post that I am totally bowled over by - I adore this!!! Jeanette from Jeanette-ically Manicured has some gorgeous designs on her blog and she produced several of my favourite Valentines manis this year! Enjoy! Sam xx

Hey! I'm Jeanette from Jeanette-ically Manicured (#nerdalert) and I'm I'm so excited to be guest posting! And very honored to do this for Sam who introduced me to one of my favorite mani patterns of all time. (I tried to imitate it, it went poorly AND I forgot to photograph it. But I'll try again eventually.) I haven't guest posted before and I really wanted to do this post justice. I've been pretty proud of my roses lately so I thought I'd take it up another notch and add acetone to make a watercolor roses mani. The basic idea is painting normal roses, and then dipping a small brush in acetone and gently removing some of the polish to give the roses a watercolor look.


watercolor roses nails technique

I love the result like crazy! I tried to google the method and I couldn't find anything quite like it. I can find watercolor nails where people use drips of acetone to make drops of polish look like watercolors and I've done that before and enjoyed the results, more or less. And then when you look for "watercolor roses", you just get painted roses. This is totes different!

watercolor roses manicure technique

Since I'm doing this post for Sam, I'm going to do it right. Look, I wrote down which polishes I used! The base is Revlon Blue Lagoon, a lovely sky blue with a shimmer in it, the roses are made with a red creme from Pure Ice called Siren, lowlights added in a burgundy creme from Wet n Wild called Haze of Love and then black with China Glaze Liquid Leather. I threw some leaves on there with Fingerpaints Go Van Gogh and Revlon Brilliant Strength Entice.  


DSCF1505

I'll be creating a tutorial about how to make these at some point and putting it here. Hopefully I have it up by the time Sam posts this! I did these the Sunday after Valentines' Day, so I had a lovely bouquet of red roses from my boyfriend and since this manicure features red roses, I got all artsy with it. He likes it when I do artsy things (I think), so it was a double whammy of adorable to be all artsy with his roses.


watercolor roses manicure technique

I hope you enjoyed these and I hope you enjoy the tutorial! --Jeanette  


DSCF1557
 

26 Feb 2014

FingerFood's Guest Posts - Dawn from SassyLittleNails

Hello everyone! Today's guest post comes from my blogging friend Dawn from SassyLittleNails. I'm always excited when I see a new post pop up from Dawn as her designs are always very detailed and beautifully painted, so I was thrilled when she offered to guest post. Dawn also runs a Nail Art challenge that raises awareness for different charities each month - click here to join her group. Enjoy! Sam xx

Hello my lovely friends.
I hope you are all well and good.
I was kindly asked by my friend blogger Sam at fingerfoodnails to do a Guest post on her blog while she is having to deal with this dreadful weather and floods! 
I wish Sam and everyone who is suffering with this awful weather well and that things will get back to normal ASAP.be safe and keep warm. 
I have never guest posted before so when Sam asked me I jumped at the chance to help out and also thought it makes a nice change for me too!
For those of you who do not know me or my blog I am Dawn from the UK I love nail art and beauty my blog is SassyLittleNails click HERE for my link.

I have a fun nail art today.
The famous comic Hero Superman!!
I grew up watching the Superman films my favourite being the 80s starring the late Christopher Reeve what a man he was.


The items I used for this superhero!
  • 2True Salon Shine polish in Jessie.
  • MUA polish in Koala Bear.
  • Rimmel Brit polish in Brit Blue.
  • Technic clear top coat.
  • Disney nail art pen in Red.
  • Technic nail art pen in White.
  • Marker pens in Yellow & Black.
 
I used the 2True polish as a base for the first finger and the ring finger.
I then used the Rimmel polish as a base on the thumb and little finger.
Applied the MUA polish on the middle finger and once dry I went over the Gray with the White nail art pen and painted a white shirt then I used the marker pen in black once the white was dry and outlined the shirt and drawn a tie with stripes.
The thumb I applied a white base in the middle for the logo then I used the yellow nail art pen and outlined the S shape went over the shape with the red nail art pen then when dry I outlined it all with the Black marker.
I took the marker in black and drawn a glasses frame then used the MUA and White nail pen and did a shade on the lens applied a top coat and all done!


I hope you all liked my Guest post today.
I enjoyed doing it :)
Don't forget to check back for more posts shortly.
Thanks for stopping by please follow my blog if you haven't already.
Be safe and well.
hugs
♡Dawn♡

22 Feb 2014

FingerFood's Guest Posts - Ali from Fixin' to Faff

Hello everyone! Today's guest post is brought to you by Ali from Fixin' to Faff. She is one awesome, funny lady with a flair for great nail designs (check out her chocolate dipped strawberries which is one of my favourites!) This post includes a review as well as nail art! Enjoy! Sam xx

Hey y'all!

I'm so happy to be able to step in and help Sam out, as we're all underwater in the UK right now, but her area is definitely among those severely affected.  I'm Ali from Fixin' To Faff, a native Texan who moved to England last year with my dog.  While waiting to be able to do normal things like drive and get a job, I started writing my blog in part to be able to let my friends and family back home know what I was up to, and in part to show off some of the shinies I was putting on my nails during my faff sessions. 

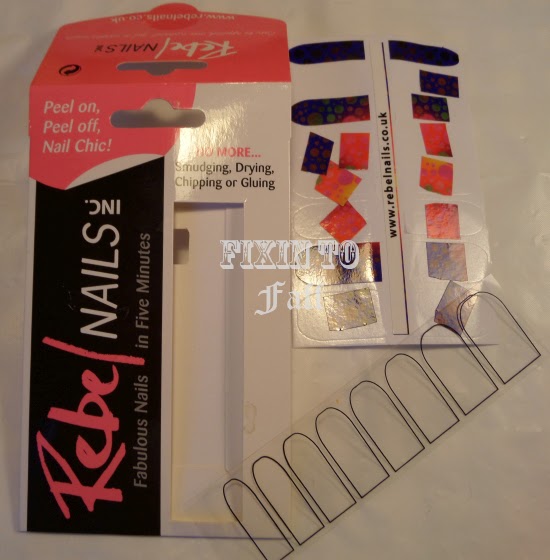
As regular readers of Finger Food Nails, you know Sam has a great love of color.  I'm continually in awe of her ability to mix colors and styles together to create breathtaking nail art.  As I was thinking about what I would write for y'all, I spied an unopened pack of nail stickers that have been sitting in my supply drawer for a while - Rebel Nails Nail Art Wraps in the Blaze pattern.

These are legitimate nail stickers - they are self-adhesive, paper-backed stickers that stick on and peel off.  They come 16 to a pack which leaves a little room for trial and error, but conveniently also have a clear plastic guide with which you can size your own nails properly to the strips.


Apologies, forgot to snap a pic before I mutilated the packaging!

Application is fairly straight-forward, as it's just a peel and stick product.  Excess is filed off from the free edge of the nail, and you're done!

Here are my finished fingers after a day of wear (including one lot of washing dishes):


Unfortunately I did have a lot of problems with creasing and buckling along the edges of my nails, possibly because of my deep C-curve shape.  Also, I'm not a fan of how the free edge is stark white from the paper backing underneath such a deeply colored pattern, so I applied a bit of Collection Parma Violet to my free edges so it wouldn't be as noticeable (to me, anyway). 


You can see that there was a bit of wear on the tips, as well - but as I said, this was after I'd done dishes.  However, the rough paper edges don't look too hot even immediately after application.


Overall I think these are a fast and easy method to put some color on your tips, but for a perfectionist like me, they weren't what I'd consider a "great" look.  Being ever diligent, I decided to try to recreate the pattern using my own nail art skills.


I think I was able to color match fairly well, though I don't think I accounted for how blue those stickers actually were, so mind have a distinctly violet cast.


I started by recreating the gradient on the stickers using Parma Violet, elf Punk Purple, and NYC Spring Street.  From there I started adding dots mimicking the original pattern, using Nail RocKits Wand Mint Green, OPI Muir Muir On The Wall, and elf Chocolate.


The huge dots were definitely a challenge, because my largest dotting tool only goes so big, so I attempted to make a dotter with the end of a pencil.  However, this didn't turn out so well, and in the end I wound up using the pen nib on the nail art pen to draw in the large green dots.  Everything else was filled in with dotting tools.


I think I got fairly close to the original design!  While this isn't my favorite look of all time, it's pretty exciting to know that you CAN recreate those intricate looks that nail art stickers and wraps have on them.  The only "special" tools required for this were a makeup sponge and some dotting tools (which can be made from household items - no special purchase required), so anyone could recreate it!


What do you think?  Did I capture the feel of the original design?

Thanks so much to Sam for letting me faff around with you guys for a day.  Hope you're all staying warm and dry!

Much love,
Ali

18 Feb 2014

FingerFood's Guest Posts - Miss Lanage of Lane's Lacquers

Hello everyone! Today I have another guest post for you, this time from the lovely Rebecca of Lane's Lacquers. I love Rebecca's blog, but am also insanely jealous of the fact that her nails and swatches always look so perfect. My "to buy" list gets longer every time she writes a new post ;) Sam xx


Hello lovelies! 

 Today I am very happy to be guest posting here at Fingerfood! After the trouble with recent floods, Sam reached out for some guests and I was more than happy to help! I'm a follower myself and feel honoured to be featured here, hope you enjoy my wee post!

 With the floods in mind, I wanted to do some sort of mani with water as a feature... A reminder of it's more beautiful side I suppose...


sinful-colors-nail-junkie-black-water-spotted-manicure

 I plumped for the water spotted technique, it's a favourite of mine! I first painted a coat of turquoise and then two of the sparkly 'Nail Junkie'. Next for the water spotting - I filled an empty yoghurt pot with luke warm water, dropped two blobs of black polish on to the surface and then sprayed my mixture of alcohol gel & water over the top. Once I had the desired spotting effect I placed my nail on to the surface and then whipped any excess out with a cotton bud before removing my finger. Finally, I cleaned up and topcoated.


sinful-colors-nail-junkie-black-water-spotted-nails


I LOVE this glitter, it's so beautiful and over the turquoise, looks just like a gleaming ocean! That, together with the spotting are a little hint to the nice side of the water :) Pretty pleased with how it turned out, hope both you guys, and Sam enjoy my efforts too! Have you ever tried this technique??


sinful-colors-nail-junkie-black-water-spotted-nail-art
Colorshow - Urban Turquoise, Sinful Colors - Nail Junkie, Color Club - Topcoat, Alcohol Gel/Water Spray

 Thanks for having me!

MissLanage x

17 Feb 2014

FingerFood's First Guest Post - Brethil of Druid Nails

Hello everyone! As promised, today I have the first ever guest post on FingerFood from Brethil at Druid Nails. What I love most about Brethil's designs is that they're always a little different (check out her stitched border mani), beautifully painted, and there is a lot of humour in her writing! Sam xx

Hi all!

I'm Brethil of Druid Nails and I'm happy to be guestposting for Sam. First of all, big hugs to Sam. All that rising water... brrr. I am fortunate enough to live in an area surrounded by sturdy dikes. If not, we'd have a serious problem where I live *winks*. Half the country lies below sealevel, the Dutch know how to handle water (most of the time). Last week I was watching a programme on TV about the floods in the UK and an old man said they were waiting for 2 things: the Army and the Dutch. To help them out of course. And the Dutch came in that particular area with enormous pumps to pump away the water. Personally I can't help in that department, sorry Sam, but I am helping with a blogpost.


Polishes I used:

Yes, that is quite a lot. But I decided to go for a very cheesy Dutch mani... incorporating a lot of (stereotypical) Dutch things. Besides polishes I also used a few nail art brushes.


My base is Lychee, 2 easy coats. There are red tulips on my index finger and a piece of a wooden clog on my middle finger. This is one of the clog designs they used traditionally. And no, I don't own any myself, but I do love tulips. On my ring finger we have blocks of Gouda cheese with a little Dutch flag. And on my pinky a windmill, couldn't leave that one out obviously.


On my thumb we have a clap skate (Dutch word for it is klapschaats), it is the current type of iceskate used in long track speedskating. The only sport the Dutch dominate in... the amount of medals we won in Sochi is insane. I don't skate myself, last time was a couple of years ago when we had a cold winter. This winter it's been more like a prolonged autumn with rain and mild temperatures.


I hope you've enjoyed this little Dutch invasion of Sam's blog and I hope the water will drain away quickly!

*hugs*